An introduction to cross-cloud access in managed Kubernetes clusters
The insights we gained from implementing cross-cloud access

In the ever-evolving landscape of cloud computing, it's increasingly common to face scenarios that necessitate cross-cloud access. Whether it’s accessing AWS services from an Azure Kubernetes Service (AKS) cluster or leveraging Azure resources from an AWS Elastic Kubernetes Service (EKS) cluster, these scenarios present unique challenges that demand innovative solutions.
A project where we migrated to AKS: Background and challenges
In one of my recent projects, we encountered the need to migrate an application from a self-managed Kubernetes cluster hosted on AWS to Azure Kubernetes Services. This transition was not just a simple lift-and-shift, as it also involved enabling secure access to cloud resources across different cloud providers.
Official documentation often falls short in covering these complex scenarios comprehensively, leading to potential gaps in implementation. Through this blog post, I aim to share insights gained from implementing cross-cloud access, focusing on the integration between Azure and AWS. This discussion will cover two key scenarios:
Enabling access to AWS services from an Azure AKS cluster.
Facilitating access to Azure services from an AWS EKS cluster.
Our goal is to foster a harmonious interaction between these two cloud giants, overcoming the common obstacles encountered in such integrations and securely granting access without the need for sharing credentials.
Proposed solution: AWS IAM Role for Service Account (IRSA) and Azure workload identity federation
Each cloud provider offers a bespoke solution to ensure secure access within their managed Kubernetes clusters. AWS employs the IRSA, allowing workloads to safely assume roles that provide necessary permissions to access cloud resources. Concurrently, Azure has rolled out Azure Workload Identity to streamline identity and access management. Both platforms require a specific add-on to inject tokens correlated with the service account.
Central to these mechanisms is OpenID Connect (OIDC), a robust and time-tested protocol foundational to identity verification across disparate platforms. OIDC is pivotal for securely interconnecting Azure and AWS services, offering a secure, scalable, and adaptable authentication framework that is crucial to our approach, guaranteeing smooth and dependable identity management across cloud environments.
OpenID Connect primer
OpenID Connect (OIDC) is a crucial protocol for verifying identities across various cloud platforms, enhancing the OAuth 2.0 framework by securely verifying a user's identity through an authorisation server and enabling access to resource servers. Although frequently used, the complexities of OAuth 2.0 and OIDC can initially be overwhelming, prompting a deeper exploration to understand how these protocols facilitate secure cross-cloud access.
Understanding OAuth 2.0 and OIDC
In essence, accessing specific data or services requires authorisation to ensure the request is permitted and identity verification to confirm that the requestor is indeed who they claim to be. While OAuth 2.0 handles authorisation, it does not inherently confirm the requester's identity. OIDC addresses this gap by adding a layer of identity verification atop OAuth 2.0.
Core components involved:
User Data: The data or services needed, managed by a resource server.
Resource Owner: The owner of the data or service.
Authorisation Server: Authorises access requests.
Relying Party/Client Application: Initiates access requests. Upon approval from the Resource Owner, the Authorisation Server issues an "Access Token."
This framework ensures that data access is both authenticated and authorised.
OAuth 2.0 Flows
The OAuth 2.0 protocol includes various flows to accommodate different scenarios:
1. Authorisation code flow: Used in systems like "Sign in with Google," where a user logs in to share specific data, receiving an access token in exchange for an authorisation code.
2. Implicit flow: Previously popular in applications that couldn't securely store secrets, such as single-page applications. Now, due to security concerns, more secure methods like the Authorisation Code Flow with PKCE are recommended.
3. Password credential flow: Employed when there is a strong trust relationship between the resource owner and the client, such as personal mobile apps.
4. Client credential flow: Ideal for server-to-server interactions, where a client application uses its credentials to obtain an access token directly, granting access to the resource server.
In all these flows, OIDC enhances the process by adding an "ID Token" to verify the user's identity, providing a robust identity layer over the existing OAuth 2.0 authorisation structure. For further details, you can refer to the official OpenID Connect documentation.
OIDC in cloud Kubernetes environments
In this section, I share detailed authentication steps for AWS IRSA with Amazon EKS and Azure Workload Identity in AKS.
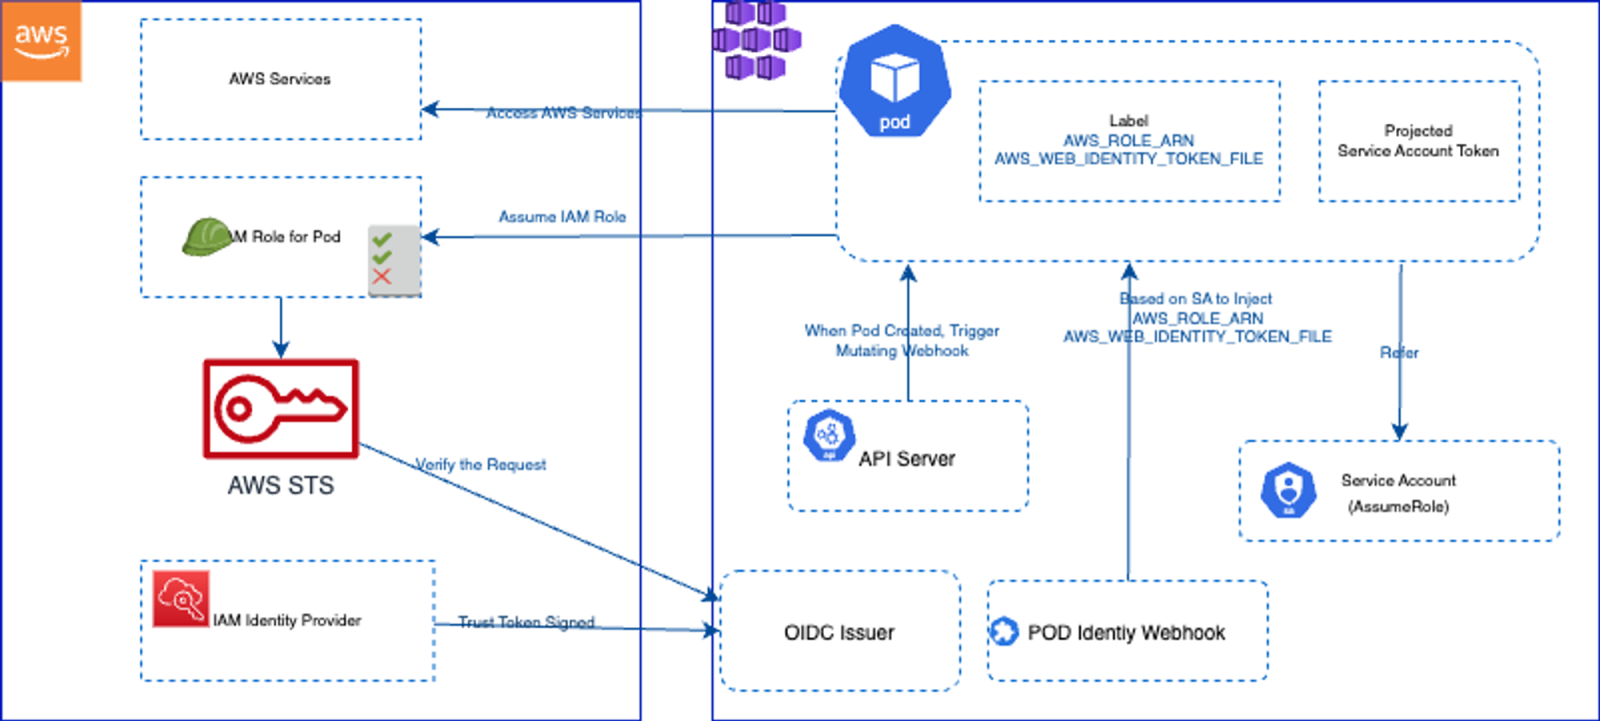
AWS IRSA with Amazon EKS
In AWS IRSA (IAM Roles for Service Accounts) within Amazon EKS, the OAuth flow used is akin to the Client Credentials Grant. This design is specifically tailored for machine-to-machine communication where an application acts on its own behalf rather than acting for a user. AWS IAM plays a critical role here, validating service account tokens issued by EKS and providing scoped AWS credentials for accessing AWS resources.
Detailed authentication steps in AWS IRSA using an OIDC provider:
1. OIDC provider configuration:
Within AWS EKS, an OIDC provider is configured to connect the Kubernetes cluster's identity system with AWS IAM. This OIDC provider is not a separate service but a configuration within AWS IAM that trusts the Kubernetes cluster's service account tokens.
The OIDC provider in AWS is set up to trust tokens issued by the Kubernetes cluster, meaning it recognises these tokens as authentic credentials.
2. Service account token:
Each Kubernetes pod can be assigned a specific service account. This account has a JWT (JSON Web Token) associated with it, which is automatically managed and rotated by EKS.
This JWT includes claims that identify the particular service account and permissions.
3. Authentication process:
When a pod in EKS needs to access AWS resources, it retrieves its JWT from the file system (mounted by EKS into the pod).
The pod or the application inside it then presents this JWT in a request to AWS IAM as part of the API call to assume the linked IAM role.
4. Token validation:
AWS IAM, acting as the OIDC provider, validates the JWT against the issuer URL, the audience (
aud), and other claims included in the JWT. These validations ensure that the token is indeed issued by the trusted EKS cluster and that it is intended for the specific IAM role it is requesting.This validation process is crucial as it confirms the authenticity and appropriateness of the request, effectively authenticating the service account's identity based on the OIDC standards.
5. Credential issuance:
Upon successful validation, AWS IAM issues AWS credentials (access key, secret key, and session token) to the pod. These credentials are temporary and scoped to the permissions defined in the IAM role associated with the service account.
6. Using AWS resources:
With these credentials, the pod can make authenticated and authorised API calls to AWS services, operating within the permissions boundaries set by the IAM role.
For more information, refer to the official documentation.
Azure Workload Identity in AKS
Similarly, in Azure Kubernetes Service (AKS), the Azure Workload Identity utilises a flow comparable to the OAuth 2.0 Client Credentials Grant. This setup allows Kubernetes pods to securely access Azure resources by leveraging Azure Active Directory (AAD) identities. The AKS manages the association between Kubernetes service accounts and AAD identities, facilitating a secure and scalable authentication method without user interaction.
Detailed authentication steps in Azure AD Workload Identity for Kubernetes:
1. OIDC provider configuration:
Azure AD (Active Directory) Workload Identity uses Azure Active Directory (AAD) as the OIDC provider. This configuration involves setting up Kubernetes to issue tokens that Azure AD can trust. The integration between Kubernetes and Azure AD allows Kubernetes service accounts to use these tokens to authenticate against Azure resources securely.
2. Service account token:
In Azure Kubernetes Service (AKS), each pod can use a Kubernetes service account that is automatically integrated with Azure AD using the Azure Workload Identity setup. The tokens issued to these service accounts are projected into the pod's file system and are used for authentication with Azure AD.
3. Authentication process:
A pod needing to access Azure resources will use the token provided to its Kubernetes service account.
This token is presented to Azure AD as part of the request to access Azure resources.
4. Token validation:
Azure AD validates the Kubernetes service account token using established trust configurations. It checks the issuer, the audience, and other claims in the token to ensure it is valid and issued by a trusted Kubernetes cluster.
This validation is crucial as it ensures the token's authenticity and appropriateness for the requested Azure resource access.
5. Credential issuance:
Once the token is validated, Azure AD issues an Azure access token to the pod.
This token is specifically scoped to the permissions that are assigned to the Azure AD identity linked with the Kubernetes service account.
6. Using Azure resources:
The pod uses the Azure access token to make authenticated and authorised API calls to Azure services.
These services validate the Azure access token and provide access based on the permissions configured for the Azure AD identity.
For more information, refer to the official documentation.
Running IRSA in AKS
Following in the footsteps of IRSA in EKS, we simply need to substitute the EKS cluster with the AKS cluster. AKS hosts a public endpoint to expose the OpenID Configuration via the OIDC Issuer URL. Next, we need to create an IAM Identity Provider (IDP) that points to the AKS OIDC Issuer URL. This IDP is then associated with an IAM Role as a trust policy, along with a policy that grants the required permissions needed to access AWS services. Finally, we annotate the service account in the AKS cluster with the IAM Role ARN (Amazon Resource Name) that we created earlier.
In detail, we need to follow the below steps:
In Azure: Create a resource group that hosts the AKS cluster.
In Azure: Create an AKS cluster and enable the OIDC Issuer.
In Azure: Create a service account (SA)
In Azure: Get the OIDC Issuer URL.
In AWS: Create a resource (an S3 bucket) to check the access.
In AWS: Create a role providing access to the S3 bucket created above.
In AWS: Create an identity provider that points to the AKS OIDC Issuer URL.
In Azure: Annotate the SA in AKS with the IAM Role ARN that we created above.
In Azure: Install the
amazon-eks-pod-identityhelm chart.In Azure: Create a workload that uses the SA and try accessing the AWS Service in this case S3 bucket.
In the next section, we’ll now get our hands dirty. I have used azure cli in the various steps you’re about to read — make sure that you have authenticated to Azure using your credentials.
At the end of the next section, our solution will look like this
Create an AKS cluster
Run the below commands and note that we set some env variables which will build up over time and will be used later down the line.
# Set required environment variables.
export LOCATION="eastus"
export RESOURCE_GROUP_NAME="rg-aks-az-identity"
export CLUSTER_NAME="aks-az-identity"
export SERVICE_ACCOUNT_NAMESPACE="default"
export SERVICE_ACCOUNT_NAME="workload-identity-sa"
export SUBSCRIPTIONID=$(az account show --query id -o tsv)
export AZURE_TENANT_ID=$(az account show -s ${SUBSCRIPTIONID} --query tenantId -otsv)

# Create resource group.
echo "Creating a resource group: ${RESOURCE_GROUP_NAME}"
az group create --name ${RESOURCE_GROUP_NAME} --location ${LOCATION}

# Create AKS cluster.
az aks create \
    --resource-group ${RESOURCE_GROUP_NAME}  \
    --name ${CLUSTER_NAME} \
    --network-plugin azure \
    --enable-managed-identity \
    --generate-ssh-keys \
    --node-count 1 \
    --enable-oidc-issuer \
    --outbound-type  loadBalancer

# Output the OIDC issuer URL.
export SERVICE_ACCOUNT_ISSUER=$(az aks show --resource-group ${RESOURCE_GROUP_NAME} --name ${CLUSTER_NAME} --query "oidcIssuerProfile.issuerUrl" -otsv)

# Get the kubeconfig for the Kubernetes clusters.
az aks get-credentials --name ${CLUSTER_NAME} --resource-group ${RESOURCE_GROUP_NAME}

# Create a new Service account.
kubectl create sa ${SERVICE_ACCOUNT_NAME} -n ${SERVICE_ACCOUNT_NAMESPACE}
Create an AWS resource for testing the access from AKS
First, you need to create an Amazon S3 bucket. Replace your bucket name with your desired bucket name and your region with the AWS region you want to use. Copy a file into the S3 bucket for testing later. Note that we created a dummy text file named test-file.txt for testing the access.
export BUCKET_NAME=irsaaccess
export REGION=us-east-1
aws s3api create-bucket --bucket ${BUCKET_NAME} --region ${REGION}

aws s3 cp test-file.txt s3://${BUCKET_NAME}/test-file.txt
Create an AWS IAM Identity provider
Create an Identity provider from the AWS console with the Azure OIDC Issuer URL from the above SERVICEACCOUNTISSUER and audience as `sts.amazonaws.com`
You need three pieces of information:
1. OIDC Issuer Url from AKS.
2. Audience which is sts.amazonaws.com.
3. CA Root cert thumbprint.
The first two pieces of info exist already, so now we need to get the CA Root Cert thumbprint.
# Extract the OIDC host from the issuer URL
export OIDC_ISSUER=$(echo $SERVICE_ACCOUNT_ISSUER | sed 's|https://||')
export OIDC_HOST=$(echo $SERVICE_ACCOUNT_ISSUER | sed 's|https://||' | cut -d'/' -f1)

# Fetch the certificate chain from the OIDC host
echo | openssl s_client -connect $OIDC_HOST:443 -servername $OIDC_HOST -showcerts 2>/dev/null | awk '/-----BEGIN CERTIFICATE-----/{cert=$0 "\n"; next} /-----END CERTIFICATE-----/{cert=cert $0 "\n"; last_cert=cert; next} {cert=cert $0 "\n"} END{print last_cert > "last_cert.pem"}'

# Calculate the SHA-1 fingerprint of the root CA certificate and format it how AWS Expects it.
CERT_THUMBPRINT=$(openssl x509 -in last_cert.pem -fingerprint -noout -sha1 | sed 's/sha1 Fingerprint=//' | tr -d ':')

rm last_cert.pem

export IAM_IDP_ARN=$(aws iam create-open-id-connect-provider --url $SERVICE_ACCOUNT_ISSUER --client-id-list "sts.amazonaws.com" --thumbprint-list $CERT_THUMBPRINT | jq -r '.OpenIDConnectProviderArn')
Create an IAM Policy to grant access to the S3 bucket
Use the below policy JSON and save it to a file locally as s3-policy.json to consume later. Note the bucket name matches the name of the S3 bucket we created earlier.
{
    "Version": "2012-10-17",
    "Statement": [
        {
            "Effect": "Allow",
            "Action": [
                "s3:GetObject",
                "s3:ListBucket"
            ],
            "Resource": [
                "arn:aws:s3:::irsaaccess",
                "arn:aws:s3:::irsaaccess/*"
            ]
        }
    ]
}
Run the below command to create the custom policy. Please make sure that you configure aws cli.
export POLICY_ARN=$(aws iam create-policy --policy-name S3ListReadPolicy --policy-document file://s3-policy.json | jq -r '.Policy.Arn')Create a trust relationship policy document
Use the templated JSON below to create a trust policy document and save it as trust-policy-template.json.
{
    "Version": "2012-10-17",
    "Statement": [
        {
            "Effect": "Allow",
            "Principal": {
                "Federated": "$IAM_IDP_ARN"
            },
            "Action": "sts:AssumeRoleWithWebIdentity",
            "Condition": {
                "StringEquals": {
                    "$OIDC_ISSUER:sub": "sts.amazonaws.com"
                },
                "ForAnyValue:StringEquals": {
                    "$OIDC_ISSUER:sub": [
                        "system:serviceaccount:$SERVICE_ACCOUNT_NAMESPACE:$SERVICE_ACCOUNT_NAME"
                    ]
                }
            }
        }
    ]
}
We have a templated trust policy file named trust-policy-template.json and using the envsubst CLI replace the the template values from env variables which is ready for us to consume.
envsubst < trust-policy-template.json > trust-policy.jsonNow this has generated a new file trust-policy.json with the required configuration.
Create an IAM Role by attaching a trust policy
You create the role using the AWS CLI by specifying the role name and the trust relationship policy document. Save your trust policy JSON to a file, for instance, trust-policy.json, and then run the below AWS CLI command
export WEB_IDENTITY_ROLE=$(aws iam create-role --role-name MyWebIdentityRole --assume-role-policy-document file://trust-policy.json | jq -r '.Role.Arn')Once the role is created, you can attach permission policies to define what resources and actions the role can access. If you already have a policy ARN to attach, you can use:
aws iam attach-role-policy --role-name MyWebIdentityRole --policy-arn $POLICY_ARNAnnotate the Service account for IRSA
kubectl annotate sa ${SERVICE_ACCOUNT_NAME} -n ${SERVICE_ACCOUNT_NAMESPACE} eks.amazonaws.com/role-arn="${WEB_IDENTITY_ROLE}" --overwrite
kubectl annotate sa ${SERVICE_ACCOUNT_NAME} -n ${SERVICE_ACCOUNT_NAMESPACE} eks.amazonaws.com/audience="sts.amazonaws.com" --overwrite
kubectl annotate sa ${SERVICE_ACCOUNT_NAME} -n ${SERVICE_ACCOUNT_NAMESPACE} eks.amazonaws.com/sts-regional-endpoints="true" --overwrite
kubectl annotate sa ${SERVICE_ACCOUNT_NAME} -n ${SERVICE_ACCOUNT_NAMESPACE} eks.amazonaws.com/token-expiration="86400" --overwrite
Deploy the pod identity webhook
This webhook is for mutating pods that will require AWS IAM access and it can be installed using the helm chart below:
https://artifacthub.io/packages/helm/jkroepke/amazon-eks-pod-identity-webhook
Note that cert-manager is a pre-requisite for this add-on and you can install this from the official documentation https://cert-manager.io/docs/installation/.
kubectl apply -f https://github.com/cert-manager/cert-manager/releases/download/v1.14.4/cert-manager.yaml

helm repo add jkroepke https://jkroepke.github.io/helm-charts/
helm install amazon-eks-pod-identity-webhook jkroepke/amazon-eks-pod-identity-webhook
Run a workload in the AKS that needs S3 bucket access
Note that we are deploying a pod using the service account created earlier in this setup. This pod utilises the Amazon aws-cli image to execute some CLI commands and test the access.
cat <<EOF | kubectl apply -f -
apiVersion: v1
kind: Pod
metadata:
  name: awscli
  namespace: ${SERVICE_ACCOUNT_NAMESPACE}
  labels:
    app: awscli
spec:
  serviceAccountName: ${SERVICE_ACCOUNT_NAME}
  containers:
  - image: amazon/aws-cli
    command:
      - "sleep"
      - "604800"
    imagePullPolicy: IfNotPresent
    name: awscli
  restartPolicy: Always
EOF
After deployment, proceed to test the access with the following commands:
kubectl exec -it awscli -n ${SERVICE_ACCOUNT_NAMESPACE} -- aws sts get-caller-identity

kubectl exec -it awscli -n ${SERVICE_ACCOUNT_NAMESPACE} -- aws s3 ls s3://irsaaccess
Running the Azure Workload Identity in an AWS EKS cluster
The following sections cover the steps required for you to run the Azure Workload Identity in an AWS EKS cluster, from creating the AWS EKS cluster to validating access.
Create the AWS EKS cluster
I am using eksctl CLI for provisioning the cluster and please setup your aws cli with the required credentials. In my case, I am loading a default profile on my machine.
export AWS_DEFAULT_PROFILE=default

# Define variables
export CLUSTER_NAME="my-eks-cluster"
export REGION="us-west-2"
export NODE_TYPE="t3.medium"
export NODE_COUNT=1
export KUBERNETES_VERSION="1.28"

# Create the EKS cluster with OIDC identity provider
echo "Step 1: Creating EKS Cluster: $CLUSTER_NAME with OIDC identity provider"
eksctl create cluster \
  --name $CLUSTER_NAME \
  --version $KUBERNETES_VERSION \
  --region $REGION \
  --nodegroup-name "standard-workers" \
  --node-type $NODE_TYPE \
  --nodes $NODE_COUNT \
  --nodes-min $NODE_COUNT \
  --nodes-max $NODE_COUNT \
  --managed \
  --with-oidc

# Check if the cluster was created successfully
if [ $? -eq 0 ]; then
    echo "EKS Cluster $CLUSTER_NAME created successfully."
else
    echo "Failed to create EKS Cluster $CLUSTER_NAME."
fi
export OIDC_URL=$(aws eks describe-cluster --name $CLUSTER_NAME --query "cluster.identity.oidc.issuer" --output text)

export AZURE_SUBSCRIPTION_ID=$(az account show --query id -o tsv)

export AZURE_TENANT_ID=$(az account show -s ${AZURE_SUBSCRIPTION_ID} --query tenantId -otsv)
Install Azure Workload Identity
helm repo add azure-workload-identity https://azure.github.io/azure-workload-identity/charts
helm repo update
helm install workload-identity-webhook azure-workload-identity/workload-identity-webhook \
   --namespace azure-workload-identity-system \
   --create-namespace \
   --set azureTenantID="${AZURE_TENANT_ID}"
Create an Azure KeyVault for testing
export RESOURCE_GROUP_NAME="rg-aws-access-az"
export LOCATION="eastus"
export KEYVAULT_NAME="kv-identity-azwi1"
export KEYVAULT_SECRET_NAME="secret"

# Create keyvault and secret
az keyvault create --resource-group ${RESOURCE_GROUP_NAME} \
   --location ${LOCATION} \
   --name ${KEYVAULT_NAME}

az keyvault wait --name ${KEYVAULT_NAME} --created

az keyvault secret set --vault-name ${KEYVAULT_NAME} \
   --name ${KEYVAULT_SECRET_NAME} \
   --value "Test"

export KEYVAULT_URL=$(az keyvault show -g "rg-aks-az-identity" -n ${KEYVAULT_NAME} --query properties.vaultUri -o tsv)
Create a Managed Identity to federate access to a KeyVault
export IDENTITY_NAME="aws-access-az"

az group create --name ${RESOURCE_GROUP_NAME} --location ${LOCATION}

az identity create --name ${IDENTITY_NAME} --resource-group ${RESOURCE_GROUP_NAME} --query principalId -o tsv

export USER_ASSIGNED_IDENTITY_CLIENT_ID="$(az identity show --name "${IDENTITY_NAME}" --resource-group "${RESOURCE_GROUP_NAME}" --query 'clientId' -otsv)"
export USER_ASSIGNED_IDENTITY_OBJECT_ID="$(az identity show --name "${IDENTITY_NAME}" --resource-group "${RESOURCE_GROUP_NAME}" --query 'principalId' -otsv)"


az keyvault set-policy --name ${KEYVAULT_NAME} \
  --secret-permissions get \
  --object-id ${USER_ASSIGNED_IDENTITY_OBJECT_ID} \
  --resource-group ${RESOURCE_GROUP_NAME}  \
  --subscription ${AZURE_SUBSCRIPTION_ID}

az identity federated-credential create \
    --name "kubernetes-federated-credential" \
    --identity-name ${IDENTITY_NAME} \
    --resource-group ${RESOURCE_GROUP_NAME} \
    --issuer ${OIDC_URL} \
    --subject "system:serviceaccount:${SERVICE_ACCOUNT_NAMESPACE}:${SERVICE_ACCOUNT_NAME}"
Create a service account in EKS and annotate
export SERVICE_ACCOUNT_NAMESPACE="azworkload"
export SERVICE_ACCOUNT_NAME="azworkload"
kubectl create ns ${SERVICE_ACCOUNT_NAMESPACE}
kubectl create sa ${SERVICE_ACCOUNT_NAME} -n ${SERVICE_ACCOUNT_NAMESPACE}

kubectl annotate sa ${SERVICE_ACCOUNT_NAME} -n ${SERVICE_ACCOUNT_NAMESPACE} azure.workload.identity/tenant-id="${AZURE_TENANT_ID}" --overwrite
kubectl annotate sa ${SERVICE_ACCOUNT_NAME} -n ${SERVICE_ACCOUNT_NAMESPACE} azure.workload.identity/client-id="${USER_ASSIGNED_IDENTITY_CLIENT_ID}" --overwrite
Deploy the workload in EKS
cat <<EOF | kubectl apply -f -
apiVersion: v1
kind: Pod
metadata:
  name: kv-read
  namespace: ${SERVICE_ACCOUNT_NAMESPACE}
  labels:
    azure.workload.identity/use: "true"
spec:
  serviceAccountName: ${SERVICE_ACCOUNT_NAME}
  containers:
    - image: ghcr.io/azure/azure-workload-identity/msal-go
      name: oidc
      env:
      - name: KEYVAULT_URL
        value: ${KEYVAULT_URL}
      - name: SECRET_NAME
        value: ${KEYVAULT_SECRET_NAME}
  nodeSelector:
    kubernetes.io/os: linux
EOF
Validate access
To check that we are able to access the secret from the KeyVault, check the logs of the pod kv-read from above which would display the secret value. Note that the image used here uses the Microsoft Authentication Library (MSAL) go library to make use of the Workload Identity to access the KeyVault.
Conclusion
OIDC plays a crucial role in verifying identities across various cloud platforms, simplifying the complex process of integrating identity verification into OAuth 2.0. It allows for seamless, secure communication between cloud providers by ensuring that identities are authenticated properly before granting access to resources. This is particularly beneficial in scenarios where services from multiple cloud providers, like AWS and Azure, need to interoperate securely without sharing credentials directly.
Azure has abstracted much of the complexity involved in setting up the OIDC provider, offering a more user-friendly experience compared to AWS. Azure's Workload Identity integration with Azure Active Directory (AAD) provides a streamlined process where the identity management is tightly coupled with the Azure ecosystem, reducing manual configurations and potential errors.
AWS, while more complex in its setup, offers robust and flexible configurations through its IAM Roles for Service Accounts (IRSA) mechanism. This approach, although requiring a deeper understanding and more detailed configuration, allows for finely-tuned access control and extensive customization options, catering to advanced use cases and specific security requirements.


Insight, imagination and expertly engineered solutions to accelerate and sustain progress.
Contact